

Introduction
Are you ready to take your website to the next level with Thrive Architect’s Rating Element? You’re in the right place! In this step-by-step tutorial, we’ll guide you through everything you need to know about using the Thrive Architect Rating Element. Regardless of your level of experience, we have you covered.
Let’s start with the basics before we get into all the details. The Thrive Architect Rating Element is a powerful tool that allows you to add interactive rating elements to your website. These elements can be used to collect user feedback, rate products or services, or simply engage your audience in a fun and interactive way.
Getting Started with Thrive Architect Rating Element
Now that you understand the benefits, let’s get started with the practical steps.
Accessing the Thrive Architect Editor
The first step is to open the page you want to edit using your preferred website builder or editor.
Adding the Thrive Architect Star Rating Element
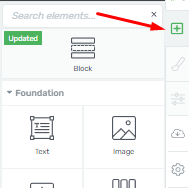
Within the Thrive Architect editor, click on the plus symbol (+) within the right sidebar. This action will initiate the process of adding an element to your page.
Finding the Star Rating Element
Scroll down through the available elements within the right sidebar until you come across the Star Rating Element. If you prefer a quicker method, you can utilize the search bar to directly search for “star rating.”

Placing the Thrive Architect Star Rating Element
After locating the Star Rating Element, drag and drop it onto the desired location on your webpage.

Customizing the Thrive Architect Star Rating Element
Upon placement, the main customization options will appear on the left sidebar of your editing interface.

Start by specifying the number of stars you want to display in the rating. By default, it is set to 2.5 out of 5. To modify this, click on each number box, triggering a drop-down menu where you can select your preferred value.
![]()
Choose a style for your star rating element by clicking on the corresponding field. A pop-up will appear, allowing you to select your preferred style. Afterward, click the apply button to confirm your choice.

The “Fill” option allows you to pick the color of the stars and the background color. Make your selections here.
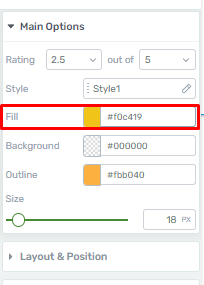
Customize the outline color of the star rating element according to your preferences.
![]()
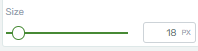
Adjust the size of the element either by moving the slider or manually inputting a numerical value in the designated area.
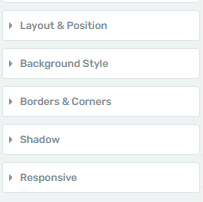
Additional Options for Thrive Architect Rating Element
Aside from the primary customization options, there may be some more general options available in the left sidebar.
Save Your Work
After you have finished customizing the Star Rating Element to your satisfaction, don’t forget to save your work. Locate and click the “Save Work” button, usually found in the bottom left corner of the editor.
![]()
Enhancing User Experience with Interactive Star Ratings in Thrive Architect
Interactive star ratings provide a unique way to gather user feedback and engage visitors. In this article, we will guide you through the process of adding these ratings to your website using Thrive Architect.
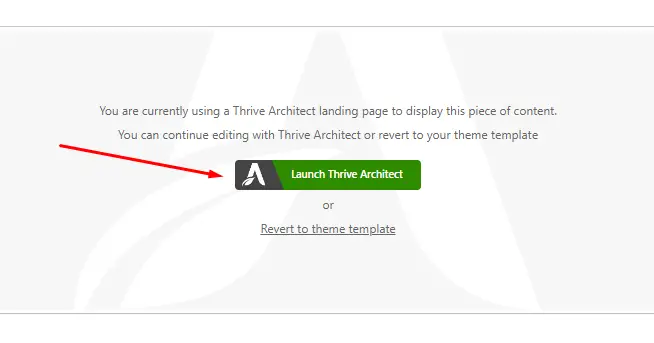
Opening the Thrive Architect Editor
Navigate to the page or post where you want to add the interactive star ratings. Click on “Edit with Thrive Architect” to open the editor.
Selecting the Thrive Architect Star Rating Element
Within the Thrive Architect editor, locate the “Content Elements” section. Choose the “Star Rating” element from the list of available options.
Dragging and Dropping the Star Rating Element
Drag the “Star Rating” element onto your page where you want the ratings to appear. You can position it within a section or column for optimal placement.
Configuring Star Rating Settings
Click on the newly added star rating element to access its settings. Here, you can customize various aspects such as the number of stars, colors, and other display options.
Customizing the Appearance of the Rating Element
Ensure that the star ratings align with your website’s design by modifying fonts, colors, and styles. This step is crucial for a seamless user experience.
Enabling User Interaction for Ratings
In the element settings, enable user interaction by selecting the option that allows visitors to click and rate. This is what makes the star ratings interactive.
Setting Up Data Collection (Optional)
If you want to collect and analyze user ratings, integrate the element with your preferred data collection method, such as a plugin or external service.
Previewing and Testing Your Ratings
Before publishing, preview your page to see how the interactive star ratings look and function. Test on different browsers and devices to ensure compatibility.
Optimizing Star Ratings for Mobile Devices
Check that the star ratings are responsive and display correctly on mobile devices. Adjust settings as needed for a seamless mobile user experience.
Saving and Publishing Your Changes
Once you’re satisfied with the placement and settings of the star ratings, save your changes and publish the page or post.
Conclusion
You’ve learned how to enhance your website with interactive star ratings using the Thrive Architect Rating Element. By following these steps, you can engage your audience and gather valuable feedback effectively.


