

Introduction
In this step-by-step guide, we’ll walk you through the process of adding a shape divider to your page using Elementor, the popular WordPress page builder. Shape dividers can enhance the visual appeal of your website and give it a unique and modern look. So, let’s get started with the simple steps to create an eye-catching design element for your web page.
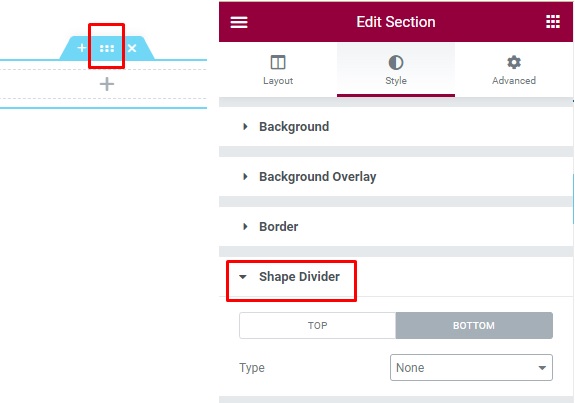
Step 1: Accessing the Shape Divider Settings
To begin, you’ll need to open your Elementor editor and navigate to the section where you want to add the shape divider. Once you’ve selected the section, follow these steps:
- Go to “Section Settings” then, click on the section that you want to edit.
- In the Section Settings, find and click on the “Shape Divider” option.
Step 2: Choosing the Shape
After you’ve accessed the Shape Divider settings, you’ll be presented with several options for customization. Here’s what you can do:
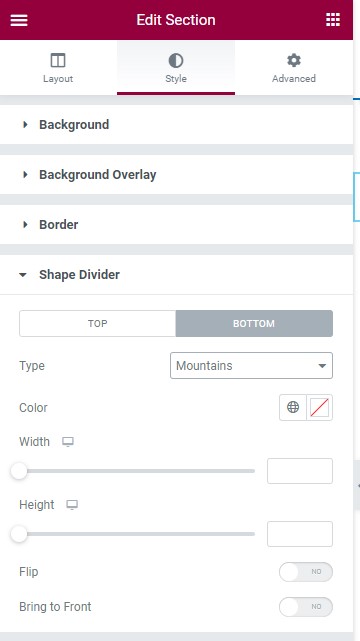
Selecting the Shape
Click on “Bottom,” and you’ll see a dropdown menu with various shape options. For example, you can choose “Mountains.”
Adjusting the Shape
You can fine-tune the appearance of your shape divider by changing its color, width, and height.
Changing the Type
You can also modify the type of the divider and even flip it if you want.
Bring to the Front
If you wish to have the shape divider displayed prominently above the content, you can use the “Bring to the Front” option.
Step 3: Typography and Additional Customizations
In this step, you have the opportunity to customize the typography and other aspects of the section. Follow these steps:
- Click on “Typography” to access text-related options. You can change the color, text, link hover color, and text alignment to suit your design.
- Additionally, you can explore other general options available in the Advanced Tab, allowing you to fine-tune the appearance and behavior of your section further.
How to Create Shapes in Elementor: A Step-by-Step Guide
Custom shapes can breathe life and creativity into your website design. In this step-by-step guide, we will walk you through the process of creating custom shapes using Elementor, a popular page builder. Whether you’re a web designer, a business owner, or just someone interested in spicing up your website, you’ll learn how to add cool and colorful shapes to your Elementor designs without the need for image files or custom code. Get ready to enhance your website’s visual appeal with this simple yet effective technique.
Creating a Solid Circle Shape
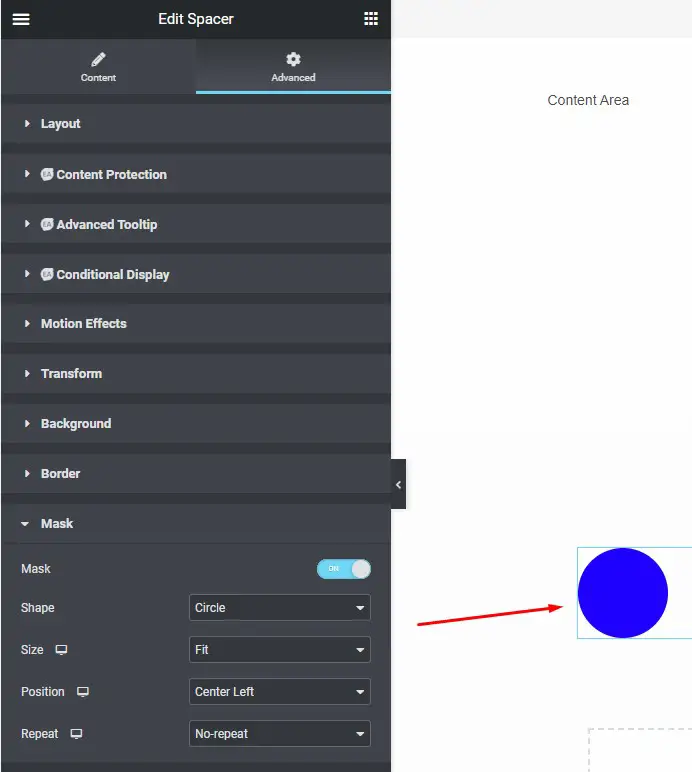
Step 1: Add a Spacer Widget
In order to get your shape to appear, first add a regular Spacer widget to the desired place. Follow these steps:
- Go to the Advanced tab and set the Spacer widget’s background color to the color you want your shape to be.
- Return to the Content tab and change the Spacer’s height to 90 pixels.

Step 2: Set Up Custom Positioning
Next, go to the Mask option under the Advanced tab and set it to “On.” Here, you can:
- Select the shape you desire.
- Adjust the size and position of the shape.
- Choose if you want it to repeat.
Step 3: Add Absolute Positioning
For precise placement of your shape, set its Position to “Absolute” in the Custom Positioning section. You can then drag it to the exact spot where you want your shape to appear.
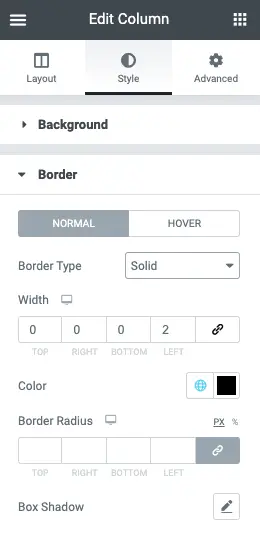
Step 4: Add a Border to Make It a Circle
To transform the square into a circle, follow these steps:
- Go to the Border section in the Advanced tab.
- Set the border for all sides to be equal. This makes sure that no matter how much you adjust its size, it will always stay a circle.
By following these simple steps, you can create a solid circle shape within Elementor.
How to Add a Vertical Divider in Elementor?
In this tutorial, we’ll explore how to add a vertical divider in Elementor, the popular WordPress page builder. Vertical dividers can help you create visually appealing layouts and separate content effectively. We will walk you through the process step by step, so you can enhance your website’s design effortlessly.
Step 1: Create a Multi-column Layout
The first step to add a vertical divider in Elementor is to locate the “Inner Section” widget and create a multi-column layout. This sets the foundation for your design.
- Open your Elementor editor and select the page or section where you want to add the vertical divider.
- In the left panel, search for the “Inner Section” widget and drag it into your section.
- Once the inner section is added, you can set the number of columns as per your design requirements.
Step 2: Customize the Border Style
Now that you have your multi-column layout set up, it’s time to customize the border style for the vertical divider.
- Click on the inner section you created to select it.
- In the left panel, under the “Style” tab, scroll down to find the “Border” settings.
- From the “Style” dropdown, select the border style that suits your design. You can choose from options like solid, dotted, or dashed.
- After selecting the style, you can further tweak the divider’s appearance by adjusting the border width. To do this, click on the link icon to unlink the width properties for all sides.
- Set the left or right border width in pixels (PX) to control the thickness of the vertical divider.
Step 3: Choose a Border Color
To make your vertical divider stand out, you can select a border color that complements your overall design.
- Under the “Border” settings, you’ll find the “Color” option. Click on it to open the color picker.
- Use the color picker to choose the desired color for your vertical divider.
- Your chosen color will be applied to the divider, making it visually appealing and in harmony with your page’s color scheme.
Step 4: Responsive Adjustments
To ensure your vertical divider looks great on all devices, you can make responsive adjustments.
- In Elementor, you can easily customize the border properties for different breakpoints. Simply click on the “Tablet” or “Mobile” icons in the editor and adjust the border settings accordingly.
- This step allows you to fine-tune the divider’s appearance for various screen sizes, ensuring a consistent and polished look across all devices.
Conclusion
Adding a vertical divider in Elementor is a simple yet effective way to enhance your website’s design and layout. By following these step-by-step instructions, you can create visually appealing content that engages your audience. Experiment with different border styles, colors, and responsive adjustments to achieve the desired look for your website.
And there you have it! Now you know how to add a vertical divider in Elementor. Start creating eye-catching layouts with this Elementor feature today.


