
Introduction
Welcome to our guide on how to set rows and columns with Elementor Data Tables! Elementor, a popular and user-friendly page builder, allows you to effortlessly create stunning websites without any coding knowledge. One of the powerful features within Elementor is the Data Tables widget, which enables you to display and organize data in a visually appealing way.
In this tutorial, we will walk you through the process of setting up rows and columns with Elementor Data Tables. Whether you’re creating a pricing comparison table, product features overview, or any other type of content that requires organized information, this guide will help you achieve the desired layout effortlessly.
Step 1: Adding a Data Table
- Open your Elementor page editor.
- Search for “Data Table” in the Elementor widgets list.
- Drag and drop the Data Table widget into your desired section.
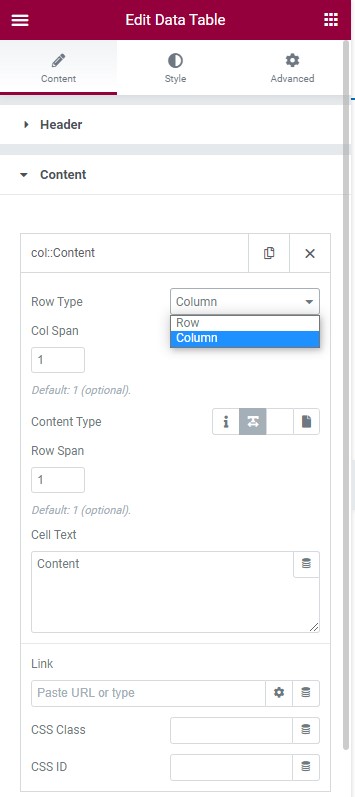
- By default, the Data Table has four columns and one row.
- Click on the Table Header to change its name to “Column Five”.

Step 2: Adding Columns and Rows
- To add a new column below the header table, click on the “Content” tab under the Data Table settings.
- Every time you add a new row, you can add a new column by clicking on “Add Item” and selecting “Column”.
- To add a new row, click on “Add Item” and select “Row”.
- To add more columns to a specific row, click on the row and then click on “Add Item” and select “Column”.
- Repeat steps 3 and 4 for each row you want to add columns to.
Step 3: Customizing the Data Table
- To customize the appearance of the Data Table, go to the “Advanced” tab under the Data Table settings.
- Here, you can adjust the table’s width, padding, and other advanced settings to make it look how you want.
How To Add Rows In Elementor?
Understanding Basic Row Creation
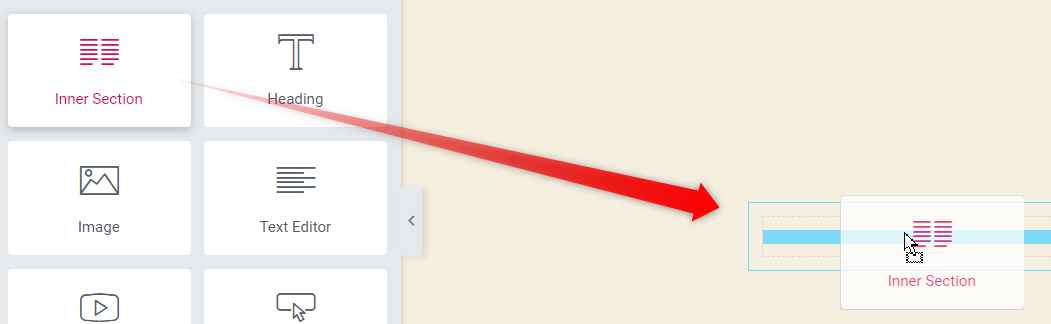
Creating a new Inner section
To begin, initiate a new Inner section within the container. Simply drag and drop it into the empty container section. This Inner section will serve as the canvas for your row.
Adding content to the Inner section
Fill the Inner section with relevant content. This could include text, images, or other widgets depending on your design requirements. This initial step sets the groundwork for your row.
Enhancing Row Structure with Elementor Heading
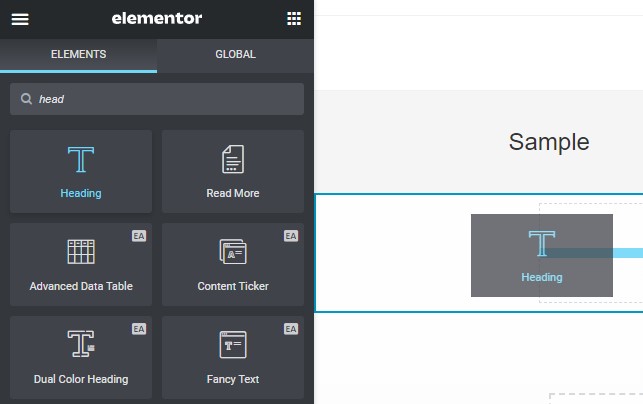
Adding an Elementor Heading above the Inner section
Now, take your design a step further by adding an Elementor Heading above the Inner section. Drag and drop the Heading element above the row, creating a structured header for the section.
Creating a header structure
With the Elementor Heading in place, you’ve established a clear header structure for the row. This structure serves as a visual guide, making your design more organized and visually appealing.
Incorporating Images into the Inner Section
Adding an image widget to the Inner section
To make your row visually engaging, integrate an image widget into the Inner section. This step allows you to create a single row featuring images, adding a dynamic element to your design.
Creating a single row with images
With the image widget in place, you’ve successfully crafted a single row within the Inner section. This row can be duplicated to create multiple rows of images, providing versatility in your design.
How To Add A Responsive Table?
Method 1 – Plugin Installation
Choose a Plugin
When it comes to designing responsive tables, plugins are your best friends. They streamline the process and offer various styles. Here are a few notable options:
- Ninja Tables: includes more than a hundred different table styles.
- WPDataTables: A feature-packed option with a premium version.
- WP Responsive Table: A simple and free plugin for easy table creation.
Installation Process
- Download your chosen plugin.
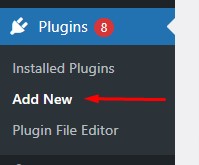
- Go to the WordPress admin dashboard.
- Click on Plugins, then Add New.
- Upload and activate the plugin.

Method 2 – Creating a Table with NinjaTables
Installation and Activation
After installing NinjaTables, follow these steps to create a table:
- Go to NinjaTables > All Tables > Add Table.
- Choose to add a new table or import one from a file.
Adding Information and Creating Columns
- Click on Add to create the table.
- Add columns to structure your table.
- Input data, specifying column headers and data types.
Setting up Table Responsiveness
- Access the menu by clicking on Always Show on all devices.
- Choose from options for responsive behavior.
Method 3 – Exploring NinjaTable’s Settings
With a table in hand, it’s time to explore customization:
Customizing Style and Appearance
- Access NinjaTable’s settings.
- Explore style options, including row colors and text alignment.
Testing Screen Responsiveness
- Use the Table Design tab.
- Test your table’s appearance on Desktop, Tablet, and Mobile views.
Method 4 – Testing and Shortcodes
Testing Table Responsiveness
- Edit your table in NinjaTable.
- Use Desktop, Tablet, or Mobile views for responsiveness testing.
Using Shortcodes to Add Tables to Website
- Find the shortcode for each table.
- Add tables easily to your content using the NinjaTable block in the Block Editor menu.
How To Add More Columns In Elementor?
Website design is a delicate dance between creativity and functionality, and Elementor serves as the choreographer for this digital ballet. One crucial aspect of Elementor’s toolkit is its column feature, allowing designers to structure content elegantly. Let’s delve into the step-by-step guide on how to add more columns in Elementor seamlessly.
Understanding Elementor Columns
Columns in Elementor act as the backbone of your webpage’s layout. They influence not only the visual appeal but also the user experience. Properly structured columns enhance readability and engagement, making them a pivotal component of any well-designed website.
Method 1: Adding Columns via Section
- Step 1: Go to the section and hover in the middle.
- Step 2: Right-click on the column icon to the left.
- Step 3: Click on “Add New Column” to add a new column to the section.
This method ensures precision by focusing on the middle of the section, offering a user-friendly approach to augmenting your Elementor layout.
Method 2: Utilizing Elementor Toolbox
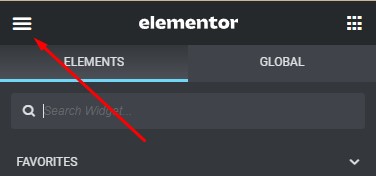
Step 1: Open the Elementor Toolbox Menu
Click on the button with three horizontal lines to the upper top left corner of the page. That will open up the Elementor menu.
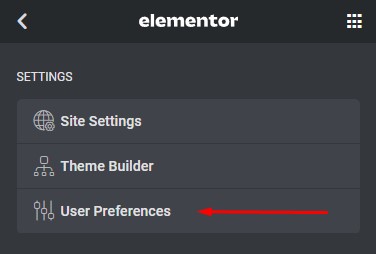
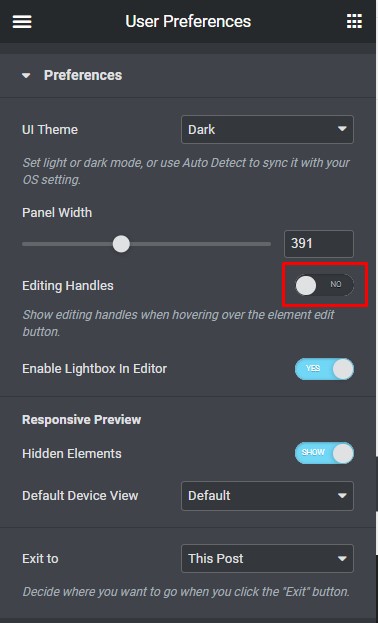
Step 2: Go to the Preferences Menu
Click on the preferences menu from the Elementor toolbox. Then, set the Editing Handles to Yes.
Step 3: Hover over the edit column icon.
- Step 3.1: Hovering over the edit column icon on the section will reveal the handles.
- Step 3.2: Now click on the “+” icon to add a column.
This method empowers users with additional editing capabilities, allowing for a more customized and tailored design.
Editing Handles and Adding Columns
Setting the Editing Handles to Yes amplifies your control over Elementor’s layout. Hovering over the edit column icon initiates the process of customizing columns to suit your design needs.
Handle Functionality
Handles within Elementor provide a range of functionalities, including adding, duplicating, and deleting columns. This versatile feature ensures flexibility in adjusting your webpage’s structure.
Step 3.1: Revealing Handles
Hovering over the edit column icon exposes the handles, giving you a visual cue for the available customization options.
Step 3.2: Adding a Column
Clicking on the “+” icon during the handle reveal allows you to effortlessly add a column to your Elementor layout, enhancing the overall design.
Conclusion
In conclusion, adding columns in Elementor is a straightforward process with the provided methods. Whether you choose the precision of Method 1 or the enhanced features of Method 2, Elementor ensures that your design experience remains intuitive and user-friendly.


