
Introduction
Beaver Builder is a user-friendly WordPress page builder plugin that empowers users to design and customize their website pages without any coding skills. It offers a drag-and-drop interface, making it easy for users to create stunning layouts. One common design choice is to have full-width pages, where content spans the entire width of the browser window. In this step-by-step tutorial, we will show you how to set up a full-width page effortlessly.
Understanding Full-Width Pages
Full-width pages refer to layouts that stretch the entire width of the browser window, eliminating side margins. The primary purpose is to provide a more immersive and engaging experience for website visitors. This design choice is not only aesthetically pleasing but also contributes to improved user interaction and navigation.
Step-by-Step Guide: Setting Full Width in Beaver Builder
Locate the Arrow Icon
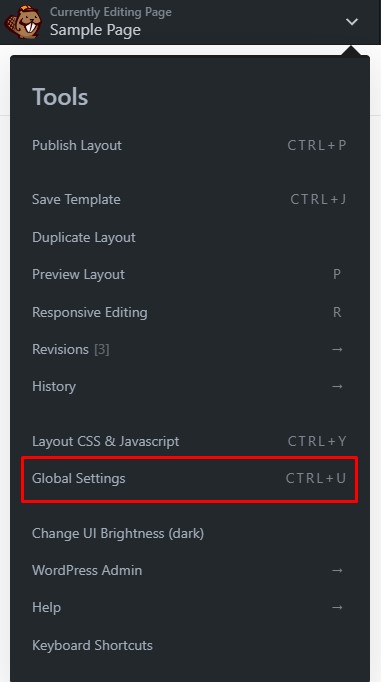
To initiate the process of setting a full-width page, start by locating the arrow-down icon at the upper left corner of your page. This icon is your gateway to a world of design possibilities.
At the upper left of the page you can see an arrow down icon, click it and an option will appear.
Access Global Settings
Clicking the arrow-down icon will reveal a menu of options. From this menu, select ‘Global Settings.’ A popup window will appear, containing various tabs and sections.
Navigate to the General Tab
Within the ‘Global Settings’ popup, navigate to the ‘General’ tab. This tab consists of five sections, each of which is essential for customizing your page’s width.
Click on ‘Row’
Under the ‘General’ tab, one of the sections is labeled ‘Row.’ Click on this section to access the settings that will allow you to adjust the width of your page.
Set Default Row Width to Full Width
Within the ‘Row’ settings, you’ll find the option to set the ‘Default Row Width’ to ‘Full Width.’ Select this option to ensure that your page spans the entire width of the screen, creating a captivating visual experience for your visitors.
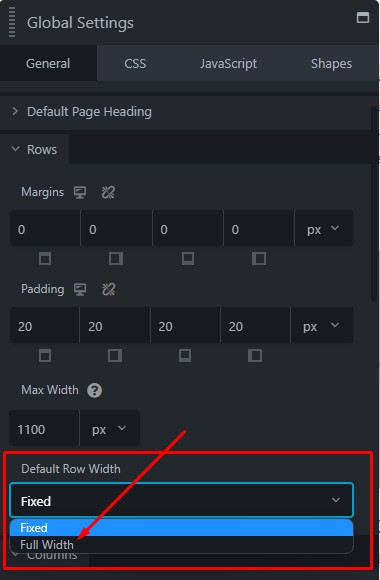
Adjust Content Width
Alongside the ‘Default Row Width’ setting, you’ll also find the ‘Content Width’ option. To optimize your full-width page, set the ‘Content Width’ to 1020px. This width strikes a balance between full-width aesthetics and content readability.
Responsiveness Matters
It’s important to note that as you set your page to full width, the distance between the row edges and the content in the header and footer will reduce as the browser width decreases. However, it will never completely disappear, as a minimum distance of 80px is maintained to ensure the content remains visually pleasing.
Customization at Responsive Breakpoints
Once the responsive breakpoint is reached, the header of your page may undergo changes, switching to a different header and navigation layout. These changes can be customized in the ‘Customizer > Header Settings.’ This step allows your website to adapt seamlessly to various screen sizes.
Full Width vs. Fixed Width
When creating a row in Beaver Builder, you have the option to specify whether the row should be full width or fixed width. This choice determines how your content is displayed.
If you choose ‘Full Width’ for your row, you can further decide whether the row’s content should also be full width or fixed width. Let’s explore these options more vividly through the following screenshot:
This screenshot showcases the three choices of row width and content width, giving you a visual representation of your design possibilities.
How To Save a Row In Beaver Builder: A Step-by-Step Guide
Beaver Builder is a powerful and user-friendly page builder for WordPress that allows you to create stunning layouts with ease. One of its handy features is the ability to save rows for future use, saving you time and effort. In this step-by-step guide, we’ll walk you through the process of saving a row in Beaver Builder.
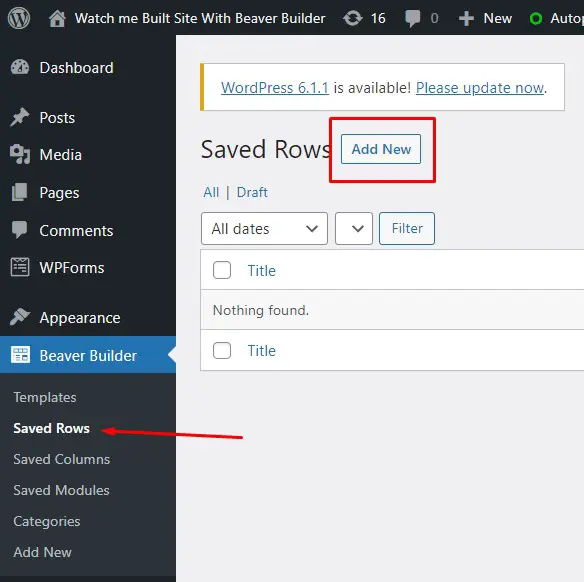
Step 1: Access Beaver Builder
To get started, you need to access the Beaver Builder menu in your WordPress admin panel. Navigate to the Beaver Builder menu, and you’ll find the option for “Saved Rows.”
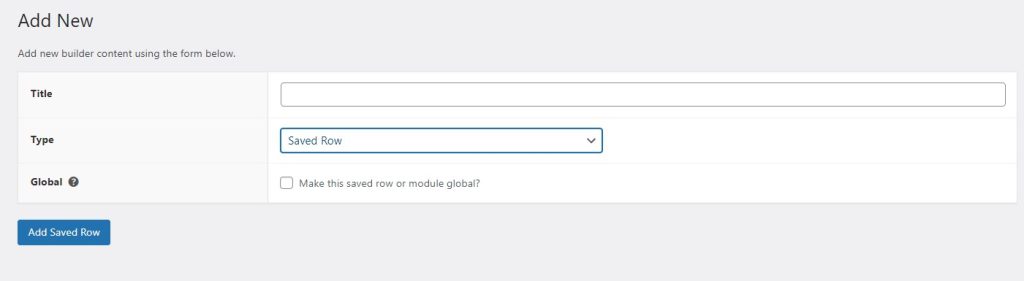
Step 2: Create a New Saved Row
Once you’re in the “Saved Rows” section, locate the “Add new” button at the top of the panel. Click on it to create a new saved row. Don’t forget to give your saved row a meaningful title for easy reference.
Step 3: Choose Global or Local
You have the option to make the saved row either global or local. If you want this row to be available across your entire website, select the checkbox to make it global. If you prefer to use it only on specific pages, leave the checkbox unchecked.
Step 4: Save Your Row
With all the necessary details in place, click the “Add saved row” button. This action will add your row to the library. Now, click “Launch Beaver Builder” to start working on your layout.
Step 5: Customize Your Row
Under your page header, you’ll find an empty row and column. This is where the magic happens. You can customize this row by dragging modules or columns from the Content panel just like you would with any other Beaver Builder layout. You have the flexibility to create a complex column layout within this row, but keep in mind that you can only create one row at a time.
Step 6: Save Your Changes
Once you’ve designed your row according to your preferences, it’s time to save your hard work. Click “Done” and then “Publish” to save the row. Your changes will be stored, and you can access them in the future.
Step 7: Access Your Saved Row
Your saved row is now accessible in two places. You can find it in the Beaver Builder admin area under “Saved Rows.” Additionally, you can access it in your regular page layouts within Beaver Builder, by going to the “Saved” tab in the Content panel.
Saving a row in Beaver Builder is an excellent way to streamline your web design process. Whether you’re creating a complex layout or simply want to reuse a specific design element, Beaver Builder makes it easy. Now, you can efficiently manage your rows and maintain a consistent design across your website.
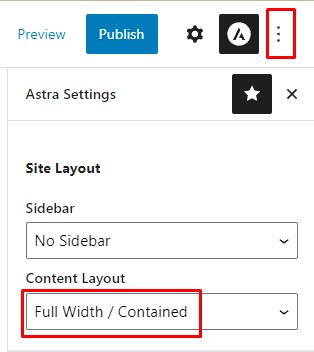
Creating Full Width Using Astra Theme in Beaver Builder?
In the some layout options that Astra offers, the Full Width/Stretched layout is the best for Beaver Builder if you need full-width pages. This layout gives Beaver Builder full control over the container and gives you the freedom to design posts and pages the way you want. Here are the steps to set the full width/Stretched:
Step 1: Go to to your Pages or Posts list from your Dashboard;
Step 2: Click on Edit under the page or post name to open editor;
Step 3: Open the Astra Settings panel; To open it will be seen at the upper right corner of the page editor.
Step 4: Click on the Content Layout dropdown and select Full Width / Stretched; Update the page or post.