

Introduction
In today’s digital age, creating visually stunning and engaging websites is essential for attracting and retaining online audiences. Elementor, a popular page builder for WordPress, offers a wide array of widgets to help you achieve just that. One such widget that can enhance the visual appeal of your website is the Image Carousel Widget. In this tutorial, we will explore how to make the most of this widget and offer valuable tips to elevate your web design skills.
Adding and Customizing the Image Carousel Widget
Setting the stage for success begins with the proper setup of Elementor. After installing and activating the plugin, selecting a theme that complements your content is vital. Once inside the Elementor dashboard, familiarize yourself with the user-friendly interface.
Locate the Image Carousel Widget
The first step in using the Image Carousel Widget is to find it within your website builder’s interface. Once you’ve located it, simply drag and drop it into the section of your webpage where you want it to appear.
Editing the Widget
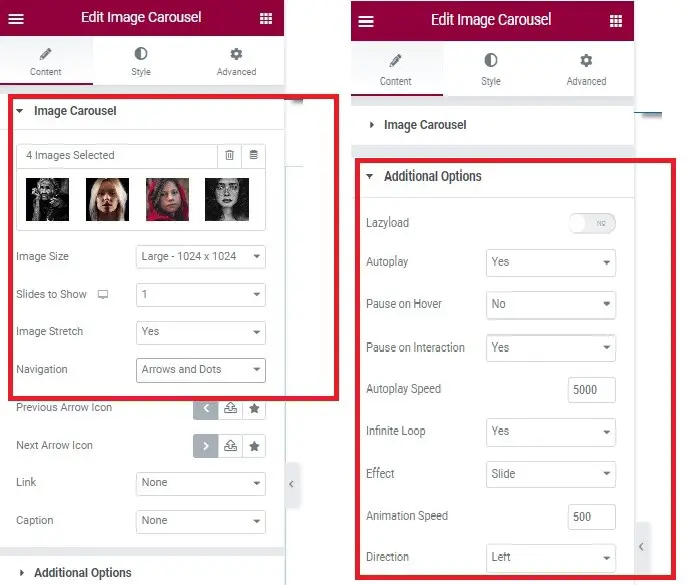
After adding the Image Carousel Widget, it’s time to make it your own. Start by selecting the images you want to feature in the carousel from your image gallery.
Adjusting Image Size and Slide Display
To ensure your images look their best, you can adjust their size within the Image Carousel Widget. You can choose to set them to a larger size, and you can also customize the number of slides displayed at once. If you prefer a single image to be displayed at a time, set “Slides to Show” to one. You can also stretch the images if needed to fit the design.
Step 4: Navigation Settings
The next step involves configuring the navigation settings. Depending on your preferences, you can choose whether or not to have navigation arrows or dots. If you want a more streamlined look, you can set the Navigation to “None.” You can also add links and captions to the images for extra interactivity.
Step 5: Additional Options
To enhance user experience, the Image Carousel Widget offers additional options. If you wish for the images to auto-play, simply click “Yes.” This feature can add an element of surprise and excitement for your visitors. You can further fine-tune the experience by adjusting the “Pause on Hover” and “Pause on Interaction” settings.
Step 6: Final Customizations
The final step involves making any additional adjustments to perfect your Image Carousel Widget. You have the freedom to customize every aspect of the widget to suit your website’s unique style and branding.
Now that you’ve learned how to use and customize the Image Carousel Widget, you can transform your website into a captivating visual experience. Engage your audience with stunning image displays and interactive features, making your website not only informative but also visually appealing.
Incorporating an Image Carousel Widget into your website is an excellent way to enhance user engagement and add a touch of elegance to your content. By following these step-by-step instructions, you can make the most of this powerful tool and create a visually stunning website that leaves a lasting impression on your visitors.
How To Use Media Carousel Widget: A Step-by-Step Guide?
In today’s digital age, websites are constantly evolving to offer an engaging and interactive user experience. One way to capture your audience’s attention is by incorporating the Media Carousel Widget into your web design. This dynamic tool allows you to display a series of images and videos in an eye-catching carousel format. Whether you’re a web designer or just someone looking to enhance your website, this step-by-step guide will walk you through the process of adding and customizing the Media Carousel Widget.
Adding the Media Carousel Widget to Your Design
Step 1: Find and Place the Widget
The first step is to locate the Media Carousel Widget in your web design platform. Whether you’re using WordPress, Wix, or any other website builder, the process is generally similar. Look for the “Widgets” or “Add Elements” section. Once found, simply drag and drop the Media Carousel Widget into the empty section of your webpage.
Step 2: Edit the Widget
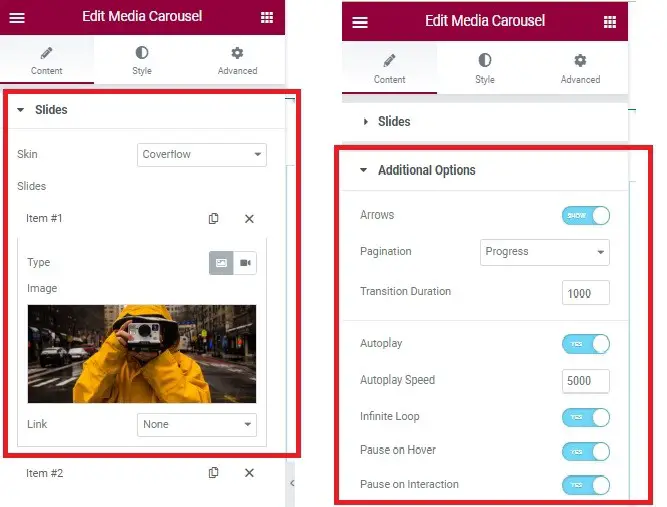
Now that you’ve added the Media Carousel Widget, it’s time to customize it. Click on the widget to open its settings. Under the “Content” tab, you will find a section labeled “Slides.” This is where you’ll upload and select the images or videos you want to feature in your carousel.
- Upload/Select Media: Click on “Upload” or “Select” to choose the images or videos you want to include in your carousel. You can pick from your gallery or upload new media.
- Adjusting Image Size: Each item in the carousel can be customized for height and width. Make sure your media fits perfectly within the frame.
Step 3: Customize Additional Options
To make your Media Carousel truly unique, explore the additional customization options available:
- Transition Effects: Experiment with different transition effects to make your carousel more visually appealing. Options may include slide, fade, zoom, and more.
- Autoplay and Speed: Decide whether you want your carousel to automatically cycle through its content and adjust the speed of transitions.
- Navigation and Dots: Enable navigation arrows and dots to help users move through the carousel easily.
- Caption and Description: Add captions and descriptions to your media to provide context and engage your audience.
How To Create a Background Slider: A Step-by-Step Guide
A background slider is a dynamic feature that displays a series of images, creating an eye-catching and visually appealing background. In this step-by-step guide, we will show you how to create a background slider for your website, customizing your section background with a slideshow.
Step 1: Add a New Section and Edit It
The first step in creating a background slider is to add a new section to your web page and then edit it. Follow these instructions:
- Go to your website’s editor or content management system.
- Add a new section to the page where you want the background slider to appear.
- Click on the newly added section to edit its properties.
Step 2: Select Slideshow as the Background Style
Once you’ve accessed the section for editing, follow these sub-steps:
- Look for the ‘Style’ tab in the editing options.
- Under ‘Style,’ locate the ‘Background’ option.
- From the available background styles, select ‘Slideshow.’
Step 3: Upload and Select Images
Now, it’s time to choose the images you want to feature in your background slider. Here’s what to do:
- Click on the ‘Plus’ sign or the designated button to upload and select the images you wish to use.
- Ensure that the selected images are visually appealing and align with your website’s theme and content.
Step 4: Adjust Background Size and Position
To make your background slider look perfect, you need to configure the size and position. Follow these steps:
- After selecting your images, look for options related to background size.
- Set the background size to ‘Cover’ to ensure the images fit the screen appropriately.
- Adjust the position to ‘Center-Center’ for optimal display.

Step 5: Customize the Section Layout
To ensure that your entire section looks presentable and harmonizes with the background slider, you can make layout adjustments. Here’s how:
- Explore the ‘Layout’ settings within the editing options.
- Modify the ‘Width’ and ‘Height’ settings to align the section with your design preferences.
By following these simple steps, you can create an eye-catching background slider for your website. This dynamic feature will undoubtedly enhance your website’s visual appeal and captivate your visitors, making their experience more engaging.
How To Add Team Member Carousel?
Step 1: Add Team Member Carousel Widget
Search for the Team Member Carousel Widget and drag it onto your desired section.
Step 2: Customize Team Member Information
- Navigate to the Content Tab.
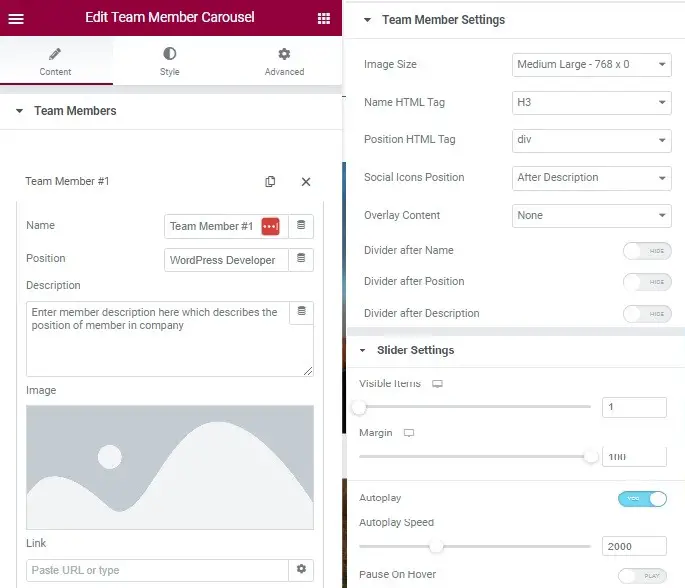
- Click on “Team Member #1” and modify the details of the specific team member, including their photo.
- Optionally, insert the URL of their Social Media accounts.
Step 3: Adjust Image Size and Description Position
Access the Team Member settings to edit the image size and description position.
Step 4: Configure Visible Items
- Scroll down to the Slider settings, located under the Content Tab.
- Customize the number of team members to be displayed on each slide according to your preference.


