
What is Elementor?
Before diving into the details of the Icon Widget, let’s briefly introduce Elementor. It is a popular drag-and-drop page builder plugin for WordPress, trusted by millions of website creators worldwide. Elementor provides an intuitive interface that eliminates the need for coding, making website design accessible to everyone.
Understanding the Icon Widget
The Icon Widget in Elementor is a handy tool that lets you insert icons anywhere on your web pages. Icons are powerful visual elements that can convey information, enhance design, and grab visitors’ attention. This widget offers a vast library of icons, ensuring you’ll find the perfect one for your content.
Benefits of Using the Icon Widget
- Enhanced Visual Appeal: Icons break up text content and make your website more engaging.
- Highlighting Key Points: Use icons to draw attention to important information.
- Increased Readability: Icons can improve the structure and flow of your content.
- User-Friendly Navigation: Icons can serve as visual cues or links to other pages.
Adding the Icon Widget to Your Page
Step 1: Find the icon widget
Drag and drop it to the page
![]()
Step 2: Set the Elementor Icon
1. Choose a Font Awesome icon from the icon library.
2. Click insert ![]()
3. From the view menu, choose between default, stacked, and framed.
4. Put in the link’s URL for the item.
5. Place the icon in left, center, or right alignment.
![]()
Step 3: Customize the Icon Styles
You can change the styles of the icon under the Style tab.
To customize the icon, under the icon menu there are normal and hover states.
Normal
1. Choose the icon’s primary and secondary colors.
2. Increase or decrease the icon’s size.
3. Rotate the icon.
![]()
Hover
1. Set the hover colors.
2. Set a hover state animation of your choosing.
3. Set the icon’s exact size.
4. Rotate the icon.
![]()
If you select Stacked or Framed view, you have the following options:
Step 1: Set the Elementor Icon
1. Select a Font Awesome icon from the icon library.
2. From the view menu, choose between stacked or framed.
3. Choose either a circle or a square for the shape of the stack or frame.
4. Put in the link’s URL for the item.
5. Place the icon in left, center, or right alignment.
![]()
Step 2: Customize the Icon Stacked or Framed Styles
To customize the icon, under the icon menu there are normal and hover states.
Normal
1. Choose the primary color (the background or frame) for the icon.
2. Choose the icon’s secondary color.
3. Set the icon size.
4. To change the size of the stack o frame, adjust the padding around the icon.
5. Rotate the icon 360 degrees.
6. Set the border radius to control the roundness of the stack or frame’s corners.
![]()
Hover
1. Choose the primary color (the background or frame) for the icon.
2. Choose the icon’s secondary color.
3. Select a hover animation effect, such as Grow, Pulse, Skew, etc.
4. Control the size of the stack or frame by adjusting the padding around the icon.
5. Rotate the icon 360 degrees.
6. Set the border radius to control the roundness of the stack or frame’s corners.
![]()
If you want to change the style of your icon, simply click the “advanced” option.
The following are the numerous available style options:
![]()
How to Place Icons Inside Elementor’s Text Editor
Since icons are their own element, using icons inside a text paragraph is not as simple as dragging the icon element inside the text editor.
However, putting icons inside a paragraph is possible, here’s how.
Step 1: Go to Font Awesome’s website
Step 2: Search for the icon you want and filter out by “FREE”

If you aren’t paying for a Font Awesome membership, then you need to filter out by free icons, or the icons won’t appear on your site.
Step 3: Click on the icon of your choice and copy the HTML code. The code should look something like this. The example below is an address card icon.
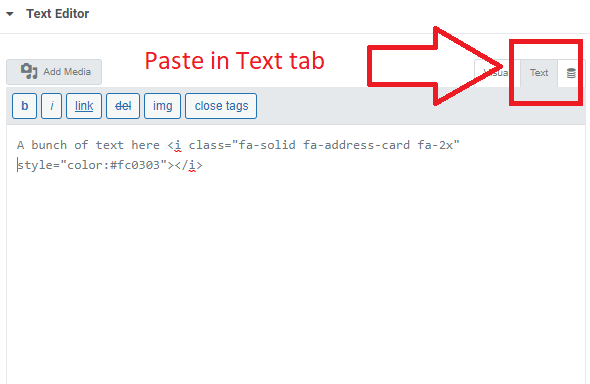
Step 5: Paste html code into text editor
Be sure you are pasting it into the “text” tab, which is the html tab of the text editor
So here is an example
And that code would produce this icon


