

Introduction to Transparent Header Menu
A transparent header menu is a sleek and modern design element that can enhance the visual appeal of your website. It allows your content to shine through while providing easy navigation for visitors. One of the popular tools for creating such dynamic website elements is Elementor, a user-friendly WordPress page builder plugin.
Understanding Elementor and Its Features
What is Elementor?
Elementor is a powerful drag-and-drop page builder plugin for WordPress, empowering users to create stunning websites without any coding knowledge. It offers a plethora of customization options, making it a favorite among designers and developers alike.
Importance of customization in web design
Customization is the cornerstone of effective web design. It enables designers to tailor the appearance and functionality of their websites to meet the unique needs and preferences of their audience. Elementor’s intuitive interface and extensive widget library make it effortless to customize every aspect of a website.
Step-by-Step Guide to Making a Transparent Header Menu in Elementor
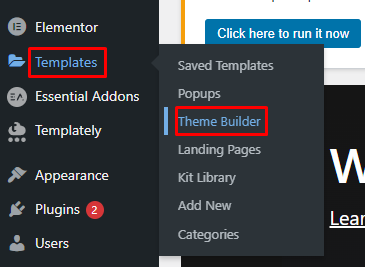
Step 1: Accessing WordPress Dashboard
Navigate to the templates section and click on the theme builder option.
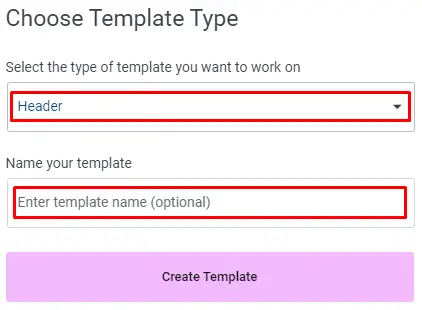
Step 2: Creating a New Header Template
Click on the “Add New Template” button to create a new template.

Select template type. Choose the template type as “Header” and give your template a suitable name.
Step 3: Designing the Header
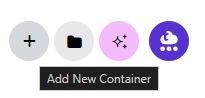
In the Elementor editor, select the ‘+’ icon and choose a suitable structure for your container.
Opt for a layout that accommodates the logo, WordPress menu, and call-to-action button.
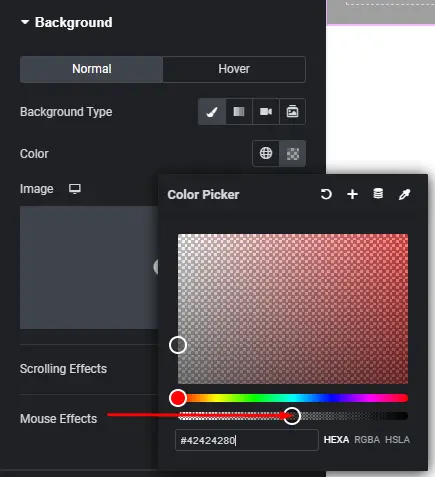
Adjust the container settings such as content width, minimum height, and background color to your preference.
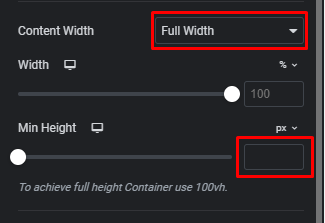
Ensure the background color is darker to enhance visibility.
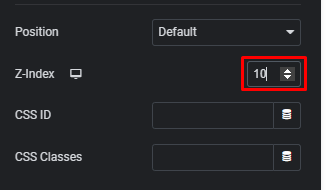
Setting Z-Index
Set the Z-index of the container to 10 to ensure the header remains on top of other elements.
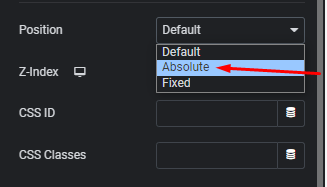
Choose Absolute Positioning
Select Absolute positioning for the header.
Publish and Preview
After customizing, publish your work to preview the header template.

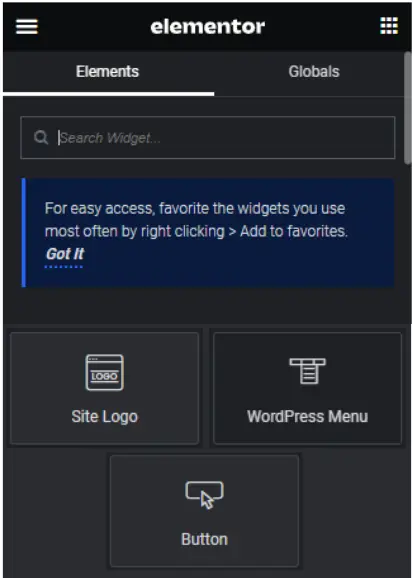
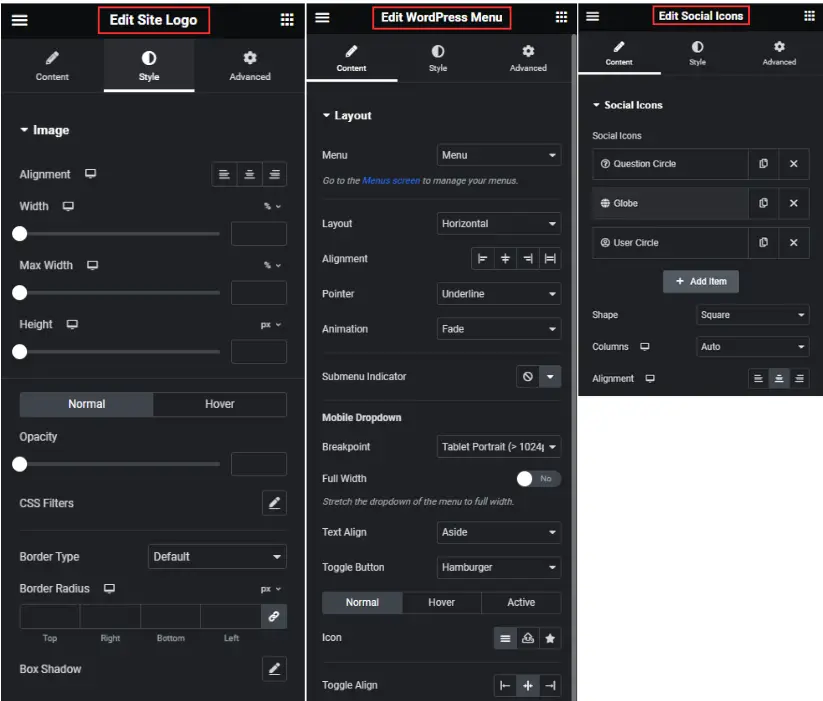
Step 4: Adding Elements to the Header
Add Logo, Nav Menu, and Button
Now, add the logo, navigation menu, call-to-action button, and social icons to the header.
Customize Elements
Customize each element according to your branding and design preferences.
Step 5: Adding Motion Effects
Apply Motion Effect
Add motion effects to each column to create visual interest.
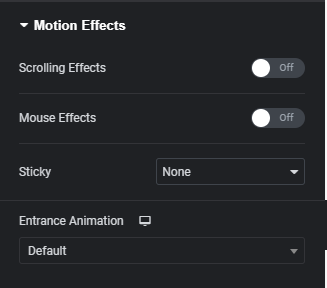
Update and Review
Update the changes and review if the motion effects are applied correctly.
![]()
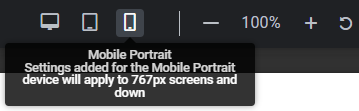
Step 6: Optimizing for Mobile
Adjusting for Mobile View
Check the header layout on mobile devices and make necessary adjustments to ensure optimal display.
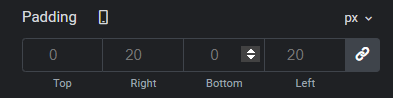
Adding Padding
Add padding to improve readability and spacing of elements on mobile devices.
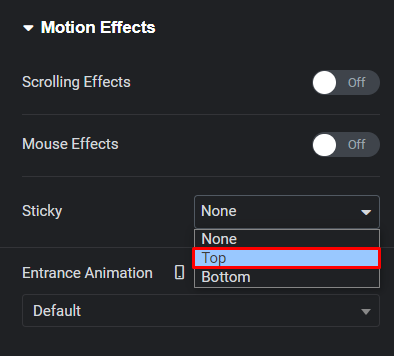
Making the Header Sticky
Make the header sticky to ensure it remains visible while scrolling. Select “Top” under Motion Effect for the sticky option.
Integrating Call-to-Action on Nav Menu
Since the call-to-action button is hidden on mobile, integrate it into the navigation menu for mobile users’ convenience.

Updating Mobile Menu
Duplicate the existing menu and customize it for mobile devices. Change its content to “Mobile Menu” and adjust settings accordingly.
Tips for Optimizing Your Transparent Header Menu
Keep it simple: Avoid cluttering the header with too many elements. Stick to essential navigation items to maintain a clean and streamlined look.
Ensure readability: Choose a font color and style that contrasts well with the background to ensure readability.
Test responsiveness: Test the transparent header design on various devices to ensure it remains functional and visually appealing across all screen sizes.
Best Practices
Clear Instructions: Provide clear and step-by-step instructions for setting up a transparent header menu in Elementor. Break down the process into simple, easy-to-follow steps to help users navigate the setup process smoothly.
Visual Aids: Incorporate screenshots or videos to supplement your written instructions. Visual aids can provide additional clarity and guidance, especially for users who are visual learners.
Compatibility Check: Before proceeding with the setup, ensure that the chosen WordPress theme is fully compatible with Elementor and supports transparent headers. This prevents potential issues and ensures a seamless integration process.
Customization Options: Highlight the various customization options available in Elementor for designing the transparent header menu. Encourage users to experiment with colors, fonts, and other design elements to personalize their header according to their preferences.
Responsiveness Testing: Emphasize the importance of testing the transparent header menu across different devices and screen sizes to ensure responsiveness. Provide guidance on how users can preview and tweak their headers for optimal display on desktops, tablets, and smartphones.
Advanced Features: Introduce users to advanced features and customization techniques available in Elementor for enhancing the transparency effect. This may include using custom CSS for further customization or integrating with third-party plugins for additional functionality.
Troubleshooting Tips: Anticipate common issues or challenges that users may encounter during the setup process and provide troubleshooting tips to address them. This could include issues related to compatibility, display inconsistencies, or misalignment of menu items.
Community Support Resources: Direct users to relevant community forums, documentation, or support channels where they can seek assistance or find answers to their questions. Encourage users to leverage these resources for additional guidance and support.
Regular Updates: Remind users to regularly update both Elementor and their WordPress theme to access the latest features, bug fixes, and security patches. Keeping software up to date helps ensure optimal performance and compatibility with new releases.
User Feedback: Encourage users to provide feedback on their experience with setting up a transparent header menu in Elementor. Use this feedback to identify areas for improvement and enhance the overall user experience for future users.
Conclusion
By following these step-by-step instructions, you can effortlessly create a transparent header for your website using WordPress. Enhance your website’s visual appeal and user experience by implementing this modern design element.


