

Introduction
In the realm of web design, Beaver Builder stands out as an exceptional page builder, providing users with a seamless and intuitive experience. Within this powerful toolkit lies the Testimonials Module, a feature that allows users to effortlessly showcase customer feedback. In this comprehensive tutorial, we’ll walk through the step-by-step process of leveraging the Testimonials Module in Beaver Builder to enhance your website with compelling testimonials.
Understanding Beaver Builder
Before we dive into testimonials, let’s understand Beaver Builder. This user-friendly WordPress plugin empowers users to design stunning websites without any coding knowledge. Its drag-and-drop interface makes it a favorite among both beginners and seasoned developers.
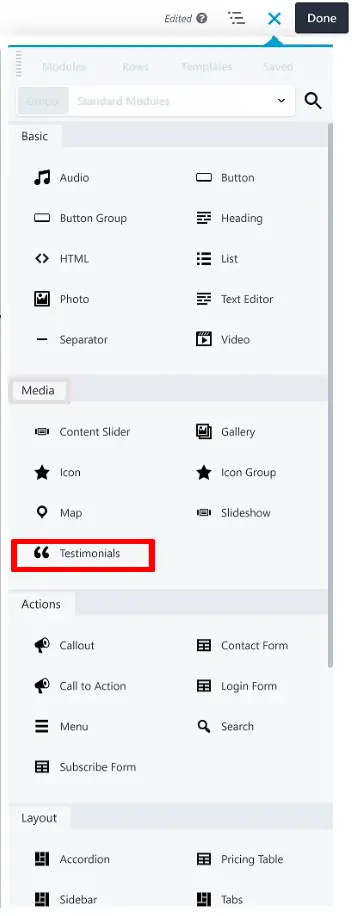
Accessing the Testimonials Module
First things first, locate the “Testimonials Module” in Beaver Builder. This is the starting point for adding compelling testimonials to your website.
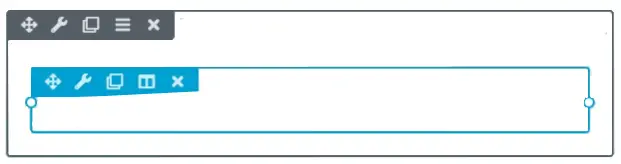
Drag and Drop
Once you’ve found the Testimonials Module, simply drag and drop it onto your desired page. This action places the module where you want it on your site.
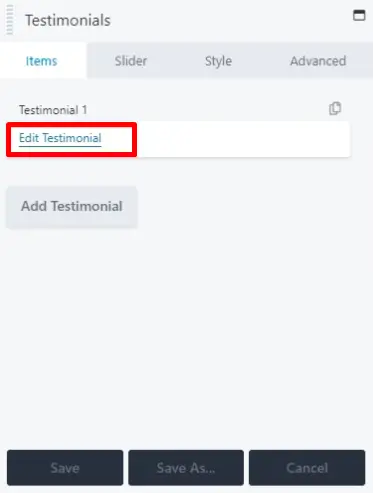
Editing Testimonials
Now, let’s dive into the details. Click on the “Edit Testimonial,” and you’ll be presented with a list of alternatives. This is where you’ll craft your testimonials for maximum impact.
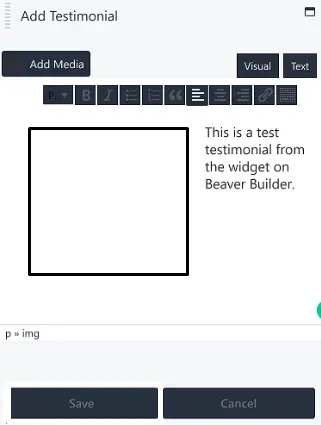
Customizing Text
You have various options to customize your testimonials. Aligning an image with the text is a great way to make your testimonials visually appealing. You can also format the text by making it into a bullet list or numbered list, adding links, and more to enhance readability.
The Slider Tab
Next, explore the “Slider tab.” Here, you can fine-tune the testimonial slider’s behavior. You’ll find settings like Auto Play, Delay, Transition, Transition Speed, and Transition Direction.
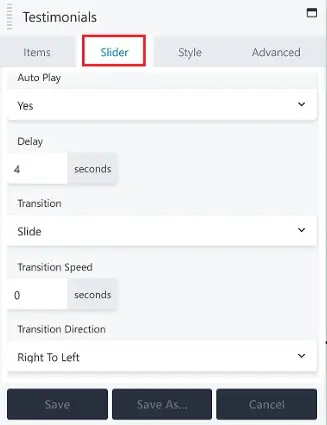
Auto Play: Decide whether you want the slider to play automatically or not.
Delay: Set the duration in seconds before the next testimonial appears.
Transition: Choose your preferred transition style.
Transition Speed: Adjust how quickly the transition occurs.
Transition Direction: Define the direction of the transition.
Styling Your Testimonials
In the “Style” tab, you have the power to give your testimonials a unique look. Here are some customization options:
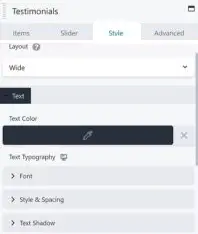
Layout: Choose between Wide or Compact layouts. Select the one that suits your website’s design.
Heading: Add a heading and adjust its size for emphasis.
Text Customization: Fine-tune text elements such as color, font, spacing, and shadow.
Arrows: Decide if you want navigation arrows for your testimonials. You can choose the arrow’s color here.
Advanced Customization
For those who crave even more customization options, explore the “Advanced” tab. Here, you can access additional settings to tailor the Testimonials Module to your specific needs.
Saving Your Changes
After making all the desired adjustments, don’t forget to click “Save.” This ensures that your newly configured Testimonials Module settings are applied.
Customizing Testimonial Layouts in Beaver Builder
In the digital landscape, testimonials play a crucial role in building trust and credibility. As website owners strive to create engaging and authentic user experiences, the layout of testimonials becomes a focal point. This article delves into the art of customizing testimonial layouts using Beaver Builder, a powerful and user-friendly page builder for WordPress.
Step-by-Step Guide to Customizing Testimonial Layouts
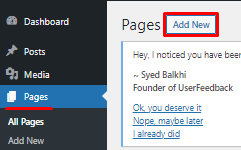
Create or Edit a Page/Post
Navigate to the WordPress dashboard and choose the page or post where you want to add or edit the testimonial section. Click on “Edit” or “Add New” to open the editor.
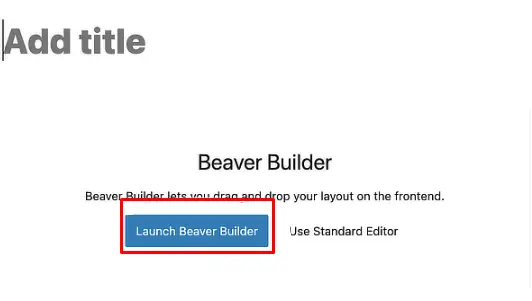
Launch Beaver Builder
Inside the page or post editor, you’ll find a button or option to “Launch Beaver Builder.” Click on it to open the Beaver Builder interface.
Add a Row for Testimonials
Within the Beaver Builder interface, click the “+” button to add a new row. You can choose the number of columns based on your design preferences. Typically, a single column layout works well for testimonials.

Add a Testimonial Module
Inside the newly created row, click the “+” button again to add a module. Search for the “Testimonial” module and click on it to insert it into your layout.
Configure Testimonial Settings
Once the testimonial module is added, you can configure its settings. This typically includes:
a. Adding Testimonial Content
- Enter the testimonial text, author name, and additional information.
- You may also upload a profile picture of the author if desired.
b. Styling Options
- Customize the typography, colors, and spacing to match your website’s design.
c. Testimonial Source
- Choose where the testimonial content is coming from, whether it’s from a custom source or your website’s content.
Customize Testimonial Layout
To further customize the testimonial layout:
a. Drag and Drop
- You can rearrange the testimonial module by simply dragging and dropping it within the row.
b. Adjust Column Width
- If you have multiple columns in your row, you can adjust the column width to create the desired layout.
c. Add Additional Modules
- You can add other Beaver Builder modules such as buttons, icons, or images to enhance the testimonial section.
Save Your Changes
Don’t forget to save your changes within the Beaver Builder interface. Click the “Save” or “Publish” button to save your customized testimonial layout.


