
Introduction
In today’s digital age, building a visually appealing and functional website is crucial. Elementor, a popular page builder for WordPress, has made this task more accessible for both beginners and seasoned developers. In this article, we’ll delve into one of Elementor’s key features – the Image Widget. We’ll explore its functionality, provide step-by-step instructions, and offer valuable tips to enhance your website’s visual appeal. Let’s get started!
Understanding the Image Widget
The Image Widget is a core component of Elementor, allowing users to effortlessly embed images into their web pages. Whether you’re a seasoned designer or a novice, this widget provides an intuitive interface for incorporating visuals into your website’s layout.
Access the Elementor Editor
Step 1: Drag and Drop the Image Widget
- Open your Elementor editor and ensure you have a section ready to add an image widget to.
- In the left panel, locate the “Image” widget from the list of available widgets.
- Click and hold the Image Widget, then drag it into the empty section of your page.
Step 2: Insert an Image
- After placing the Image Widget, you’ll notice an image icon within the widget. Click on it.
- A media library window will appear. Choose an image by either uploading one or selecting an existing image from your media library.
- To add a caption below the image, you can type your desired caption in the designated field.
- Click the “Insert Media” button to place the selected image with the caption.
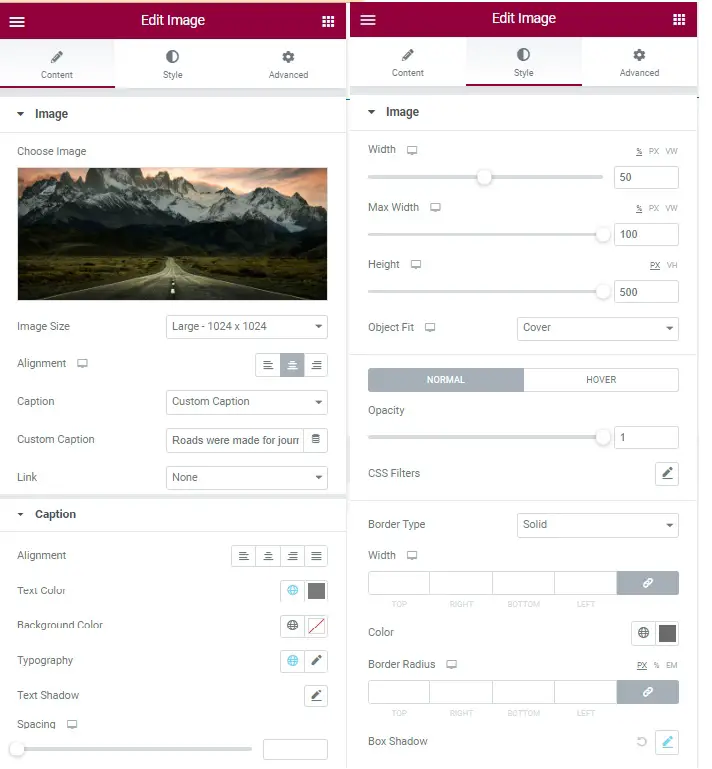
Step 3: Configure Additional Settings
- In the Image Widget settings, you have the option to add a link to the image. Click on the “Link” tab and provide the URL you want the image to link to.
- You can also adjust the image and caption style to suit your design preferences. Click on the “Style” tab to access various customization options, such as image size, alignment, border, and more.
Using the Image Widget in Elementor is a straightforward process that allows you to add images, captions, and even links to your web pages. By following these step-by-step instructions, you can enhance the visual appeal of your website and create engaging content for your visitors.
How To Use The Image Gallery?
Elementor is a popular page builder for WordPress, and it offers various elements to enhance your website’s design and functionality. One such element is the Image Gallery, which allows you to display images in an organized and visually appealing manner. In this guide, we’ll walk you through the steps to set up a basic gallery in an empty section using Elementor.
Setting Up a Basic Gallery in an Empty Section
Follow these steps to create an image gallery in an empty section of your Elementor-powered website.
Step 1: Adding the Basic Gallery Element
- Open the Elementor editor and navigate to the page where you want to create the image gallery.
- Click on the “+” icon or drag and drop the “Basic Gallery” element to an empty section on your page.
- In the “Content” tab of the Basic Gallery element, choose the images you want to display on your website by clicking the “Choose Images” button. You can select multiple images to include in the gallery.
Step 2: Adjusting Image Settings
- In the “Content” tab, you can adjust the size of your images and the number of columns in which they are displayed. This allows you to customize the layout of your gallery.
- If you want to link your images to specific web pages or media files, you can do so by adding links in the respective settings. This enables users to click on the images for additional information or to view the full-size image.
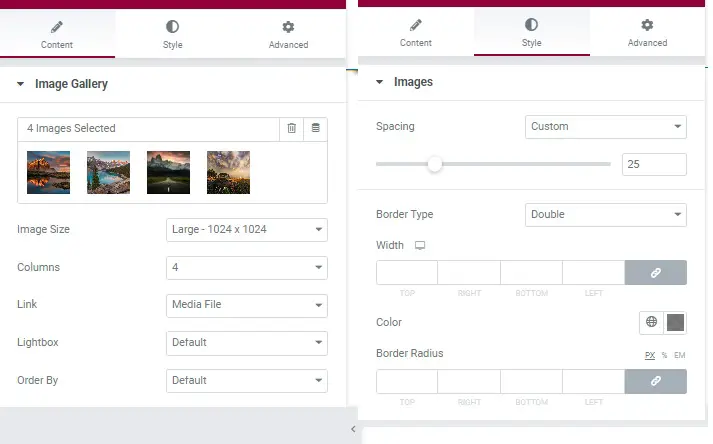
Step 3: Styling Your Gallery
Switch to the “Style” tab within the Basic Gallery element.
Here, you can adjust the spacing between your images. You can increase or decrease the gap between photos to achieve the desired look.
If you want to add a border to your images for a more decorative effect, you can do so in the “Border” settings. Customize the border size, style, and color to match your website’s design.
By following these step-by-step instructions, you can easily create a basic image gallery using Elementor and tailor it to your specific design and content needs. Customize your gallery to make it visually appealing and engaging for your website visitors.
How To Use The Image Scroller?
Adding an Image Scroller to an Empty Section
Step 1: Search for the Image Scroller, Drag and drop it to an empty section.
Step 2: Under Content Tab, go to general then choose an image as background Image.
Step 3: You can adjust the container Height, and the scroll Direction horizontally or vertically.
Step 4: If you want also auto Scroll when you hover on it, just click Yes.
Step 5: The Scroll Duration is the time scale for it’s scrolling effect of the image.

How To Use Featured Image For Section Background?
In today’s digital age, creating visually appealing websites is crucial to captivate your audience and keep them engaged. One effective way to enhance the visual appeal of your website is by using featured images for section backgrounds. These images can add depth and character to your content, making it more visually enticing. In this step-by-step guide, we will walk you through the process of using featured images for section backgrounds.
Step 1: Add an Image Widget
The first step in using a featured image for a section background is to add an Image Widget to an empty section on your website. Follow these steps:
- Open your website editor and navigate to the section where you want to add the featured image.
- Click on the “Add Widget” button, and select “Image” from the widget options.
- After adding the Image Widget, you can choose an image from your media library or upload a new one. Select an image that aligns with the content and style of the section, as this will be the background image.
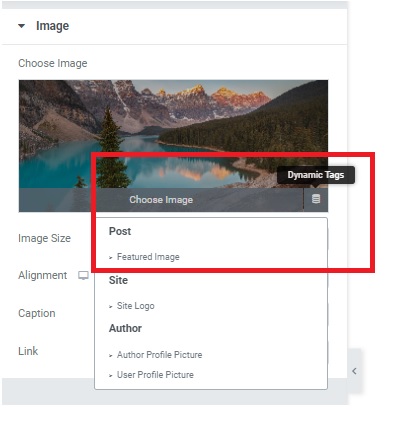
Step 2: Customize the Image Using Dynamic Tags
Once you have added the image to the section, it’s time to make it the featured background image. Follow these steps:
- Click on the image within the section.
- Look for the “Dynamic Tags” option, and select it.
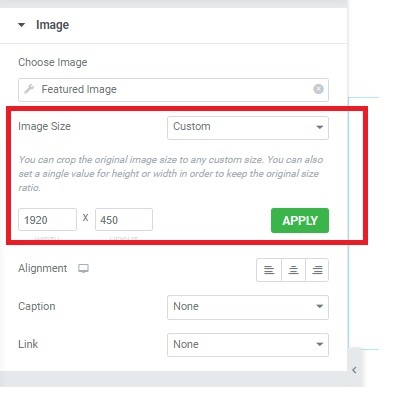
- From the Dynamic Tags menu, choose “Featured Image.” This will set the selected image as the featured background for the section.
- You can further customize the image size by selecting “Custom” and inputting the dimensions. A common size for section backgrounds is 1920×450. After setting the dimensions, click “Apply” to save the changes.
Step 3: Add Author Profile Picture Using Another Image Widget
To personalize your website and make it more engaging, consider adding an author profile picture to sections where your content is featured. Follow these steps:
- Add another Image Widget to the section where you want to display the author profile picture.
- Click on the newly added Image Widget.
- In the “Dynamic Tags” menu, select “Author Profile Picture.” This will link to the author’s profile picture and create a personal touch to the section.
By following these steps, you can use featured images for section backgrounds effectively and enhance the visual appeal of your website.

Conclusion
Incorporating featured images for section backgrounds is a simple yet effective way to make your website visually appealing and engaging. It allows you to set the tone for your content and create a more personalized user experience. By following the step-by-step instructions provided, you can easily implement this feature and make your website stand out.